Here’s how to speed up Windows 10, keep it running smoothly, protect your privacy and more.

Tired of Windows 10 bossing you around? Want to master it instead of it letting it be the master of you? If so, you’re in luck, because I’ve got plenty of tips to help you get the most out of it. Whether you want to speed up the way Windows 10 works, fix its biggest headaches, protect your privacy, teach Cortana new tricks, or more, this article has what you need. Within minutes, you’ll be gleefully asking the operating system, “Who’s your daddy?”
Speed up Windows 10
No matter how fast your PC runs Windows 10, you want to run it faster. But there’s no need to upgrade to a new PC. Follow these tips to speed up Windows 10.
Change your power settings
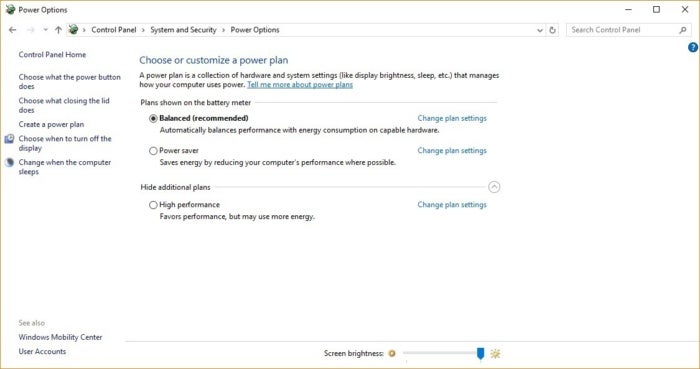
If you’re using Windows 10’s power-saver plan, you’re slowing down your PC. That plan reduces your PC’s performance in order to save energy. (Even desktop PCs typically have a power-saver plan.) Changing your power plan from power saver to high-performance or balanced will give you an instant performance boost.
To do it, launch Control Panel, then select Hardware and Sound > Power Options. You’ll typically see two options: balanced (recommended) and power saver. (Depending on your make and model, you might see other plans here as well, including some branded by the manufacturer.) To see the high-performance setting, click the down arrow next to Show Additional Plans.
To change your power setting, simply choose the one you want, then exit Control Panel. High-performance gives you the most oomph but uses the most power; balanced finds a median between power use and better performance; and power saver does everything it can to give you as much battery life as possible. Desktop users have no reason to choose power saver, and even laptop users should consider the balanced option when unplugged — and high-performance when connected to a power source.
 Preston Gralla/IDG
Change your power settings in Control Panel to give your PC a performance boost.
Disable programs that run on startup
One reason your Windows 10 PC may feel sluggish is you’ve got too many programs running in the background — programs that you may never use, or only rarely. Stop them from running, and your PC will run more smoothly.
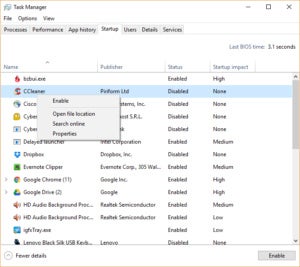
Start by launching the Task Manager: Press Ctrl-Shift-Esc or right-click the lower-right corner of your screen and select Task Manager. If the Task Manager launches as a compact app with no tabs, click “More details” at the bottom of your screen. The Task Manager will then appear in all of its full-tabbed glory. There’s plenty you can do with it, but we’re going to focus only on killing unnecessary programs that run at startup.
Click the Startup tab. You’ll see a list of the programs and services that launch when you start Windows. Included on the list is each program’s name as well as its publisher, whether it’s enabled to run on startup, and its “Startup impact,” which is how much it slows down Windows 10 when the system starts up.
To stop a program or service from launching at startup, right-click it and select “Disable.” This doesn’t disable the program entirely; it only prevents it from launching at startup — you can always run the application after launch. Also, if you later decide you want it to launch at startup, you can just return to this area of the Task Manager, right-click the application and select “Enable.”
 Preston Gralla/IDG
You can use the Task Manager to help get information about programs that launch at startup and disable any you don’t need.
Many of the programs and services that run on startup, such as OneDrive or Evernote Clipper, may be familiar to you. But you may not recognize many of them. (Anyone who immediately knows what “bzbui.exe” is, please raise your hand. No fair Googling it first.)
The Task Manager helps you get information about unfamiliar programs. Right-click an item and select Properties for more information about it, including its location on your hard disk, whether it has a digital signature, the version number, the file size and the last time it was modified.
You can also right-click the item and select “Open file location.” That opens File Explorer and takes it to the folder where the file is located, which may give you another clue about the program’s purpose.
Finally, and most helpfully, you can select “Search online” after you right-click. Bing will then launch with links to sites with information about the program or service.
If you’re really nervous about one of the listed applications, you can go to a site run by Reason Software called Should I Block It? and search for the file name. You’ll usually find very solid information about the program or service.
Now that you’ve selected all the programs that you want to disable at startup, the next time you restart your computer, the system will be a lot less concerned with unnecessary programs.
Get help from the Performance Monitor
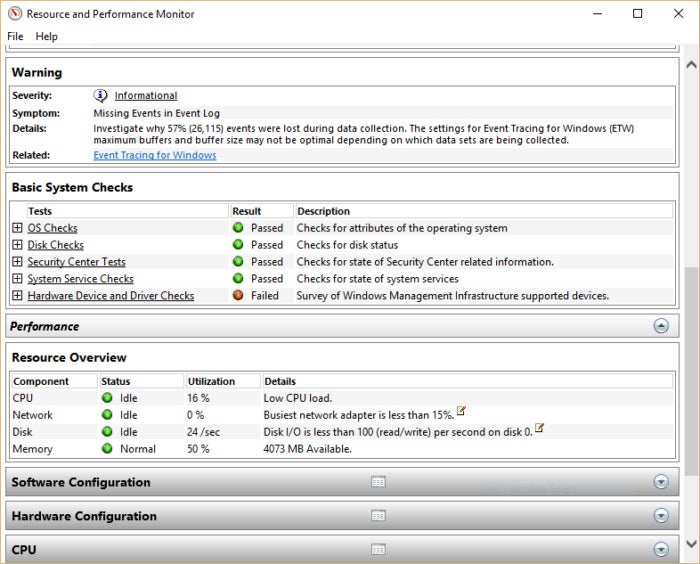
There’s a great tool in Windows 10 called the Performance Monitor that can, among other things, create a detailed performance report about your PC, detail any system and performance issues, and suggest fixes.
To get the report, type perfmon /report into your search box and press Enter. (Make sure there’s a space between “perfmon” and the slash mark.) The Resource and Performance Monitor launches and gathers information about your system. It will say that it will take 60 seconds, but I’ve found that it takes several minutes. When the Monitor finishes, it will launch an interactive report.
 Preston Gralla/IDG
You can use the Task Manager to help get information about programs that launch at startup and disable any you don’t need.
Fix Windows 10 headaches
Microsoft Windows 10 has gone a long way toward fixing the problems that were endemic with earlier versions of Windows, notably Windows 8. But it’s still far from a perfect operating system and has its share of headaches. Take the following advice for fixing three of its biggest headaches.
Fix Start menu woes
When it was first announced that Windows 10 would reinstate the Start menu, many users welcomed it. But after Windows 10 was released, some people began complaining about problems with the Start menu — it didn’t run when they clicked the Start button, or it froze, or random entries appeared or disappeared. If you’ve got Start menu problems, fear not; there are several ways to try to fix them.
Note: Before trying any of these, first restart your computer. Sometimes a mere reboot will fix things.
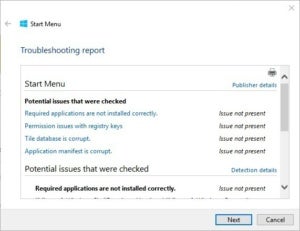
Run Microsoft’s Start menu troubleshooter tool
Before trying to fix any Start menu problems yourself, download Microsoft’s Start menu troubleshooter and run it.
 Preston Gralla/IDG
The Start menu troubleshooter can help fix a variety of woes.
The troubleshooter looks for Start menu problems and checks whether the problem is being caused by improperly installed applications, problems with the Registry, the database of Start menu tiles being corrupted, or difficulties with something called the application manifest. (The application manifest has settings that tell Windows how to handle a program when it starts.) After it checks for the problems, it does its best to fix them. If you want to see the results of what the troubleshooter finds, click “View Detailed Information” on the screen after the troubleshooter does its work.
Note that the troubleshooter won’t fix all problems. If it doesn’t solve yours, you’ll have to resort to other means.
Check for updates
There’s a chance that a Windows update will solve the problem — Microsoft continually squashes bugs in its updates. To make sure you’ve got all the latest Windows updates, go to Settings > Updates & security > Windows Update and click Check for updates. If it finds any, install them. You may need to restart your PC for the update to go into effect.
Use PowerShell to fix corrupted files
If the Start menu still has problems, the issue may be corrupted files. You can use a command-line tool called PowerShell that is built into Windows to find and fix them. Search for PowerShell in the Windows search box, right-click Windows PowerShell in the search results, and select “Run as administrator.” That will launch PowerShell.
If for some reason the search box isn’t working, press the Windows key + R on your keyboard, type “PowerShell” and press Enter. That runs PowerShell, but not the administrator account, which you need to be using. That takes a few more steps: Right-click the PowerShell icon on the taskbar and select “Pin to taskbar.” Then close PowerShell. Now right-click the PowerShell icon on the taskbar and select “Run as administrator.”
Once you’re running PowerShell as an administrator, type sfc /scannow and press Enter (note the space before the slash). PowerShell will scan your system for corrupt files. This can take some time.
When PowerShell finishes scanning your system, it will tell you that it found and fixed corrupt files, found corrupt files but couldn’t fix them, or found no corrupt files. If it found corrupt files but couldn’t fix them, type this command and press Enter: dism /online /cleanup-image /restorehealth. That should fix the problem.
Recover lost storage space
Windows 10 can be a hard-drive hog, especially if you’ve upgraded to it from a previous version of Windows, or after a major Windows 10 update. That’s because when you upgrade or install a major update, Windows 10 keeps the earlier version of the operating system, just in case you want to revert to it.
But that old operating system version is taking up several gigabytes of storage space. If you’ve got a PC with plenty of storage, no worries. But if you’re stretched for storage, it can be a serious problem.
For example, I have an HP Stream laptop with 32GB of storage, and when I tried to upgrade to the newest version of Windows 10 I couldn’t do it — my old Windows version took up so much space, the new version of Windows couldn’t install.
If you’re sure you’re not going to want to revert to your old version of Windows, you can easily delete it. It’s stored in a folder called Windows.old that you’ll find in the /Windows folder. Rather than deleting it manually, though, use the Disk Cleanup tool:
1. Run the tool by typing Disk Cleanup in the search bar and clicking the Disk Cleanup search result that appears. The tool will take a few minutes to look through your system.
2. When Disk Cleanup has finished, scroll down the list of files you can clean up and check the box next to Previous Windows installation(s). This entry will only appear if you’ve got a previous Windows installation on your hard disk.
3. Click OK. The old version of Windows will be deleted, and you’ll get your hard disk space back.
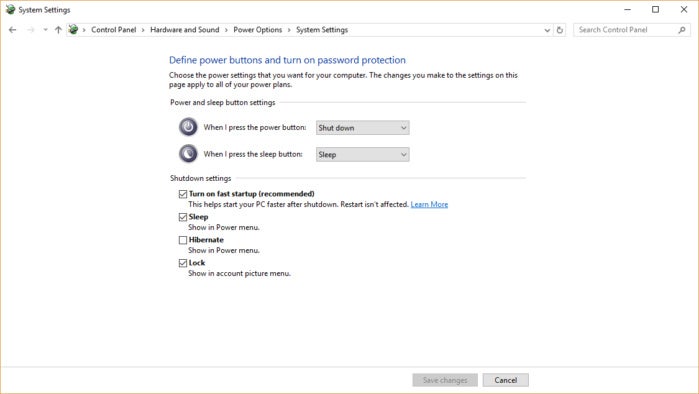
Enable Fast Startup
From the moment that Windows 10 was released, people started complaining that their bootup times were more sluggish than with previous versions of Windows. If you’re plagued by a lethargic Windows 10 startup, there’s a simple fix: use a feature called Fast Startup.
With Fast Startup, when you shut down your PC, it closes your applications and logs off all users, but loads the Windows kernel and drivers to a hibernation file on your hard disk. Then, when you restart your PC, Windows loads the kernel and drivers from the hibernation file, speeding up startup.
Here’s how to turn it on:
1. Right-click the Start button and select Power Options from the menu that appears.
2. Click “Additional power settings” on the right side of the screen.
3. Click “Choose what the Power buttons do.”
4. From the screen that appears, click “Change Settings that are currently unavailable.”
5. On the screen that appears, check the box next to “Turn on fast startup (recommended).”
6. Click “Save changes.”
That’s all it takes. Note that on some machines Fast Startup isn’t enabled. If that’s the case with yours, you won’t see the “Turn on Fast Startup (recommended)” entry.
 Preston Gralla/IDG
It’s easy to turn up Fast Startup in order to speed up your bootup time.
Protect your privacy
There has been some concern that Windows 10 gathers far too much private information from users. Whether you think Microsoft’s operating system crosses the privacy line or just want to make sure you protect as much of your personal life as possible, we’re here to help. Here’s how to protect your privacy in just a few minutes.
Turn off ad tracking
At the top of many people’s privacy concerns is what data is being gathered about them as they browse the web. That information creates a profile of a person’s interests that is used by a variety of companies to target ads (resulting in the current popularity of ad blockers). Windows 10 does this with the use of an advertising ID. The ID doesn’t just gather information about you when you browse the web, but also when you use Windows 10 apps.
You can turn that advertising ID off if you want. Launch the Windows 10 Settings app (by clicking on the Start button at the lower-left corner of your screen) and go to Privacy > General. There you’ll see a list of choices under the title “Change privacy options”; the first controls the advertising ID. Move the slider from On to Off. You’ll still get ads delivered to you, but they’ll be generic ones rather than targeted ones, and your interests won’t be tracked.
![]() Preston Gralla/IDG
Preston Gralla/IDG
You can turn off Windows 10’s advertising ID if you want; you’ll still get ads, but they’ll be generic ones.
To make absolutely sure you’re not tracked online when you use Windows 10, head to choice.microsoft.com/en-us/opt-out. In the “Personalized ads in this browser” and “Personalized ads wherever I use my Microsoft account” boxes (on the right side of the page), move the sliders from On to Off. Note that you need to go to every browser you use and make sure the slider for “Personalized ads in this browser” is set to Off.
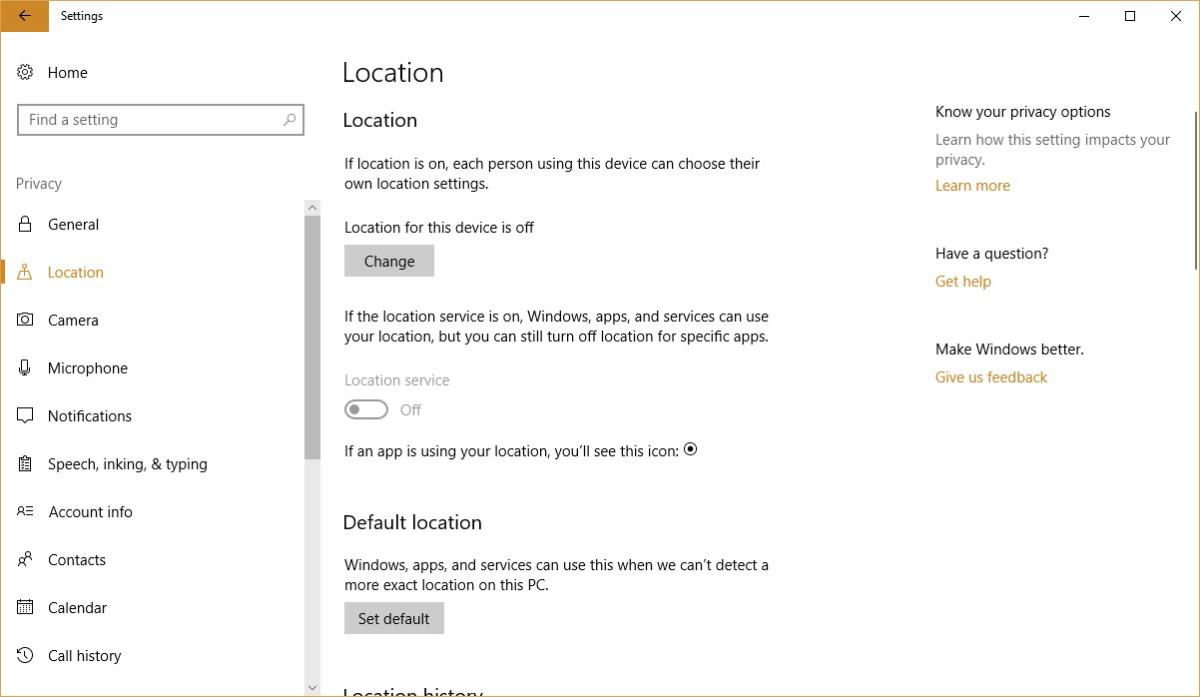
Turn off location tracking
Wherever you go, Windows 10 knows you’re there. Some people don’t mind this, because it helps the operating system give them relevant information, such as local weather, what restaurants are nearby and so on. But if you don’t want Windows 10 to track your location, you can tell it to stop.
Launch the Settings app and go to Privacy > Location. Click Change and, on the screen that appears, move the slider from On to Off. Doing that turns off all location tracking for every user on the PC.
 Preston Gralla/IDG
If you click the Change button, you can turn off location tracking for every user on the Windows 10 device.
You can turn it off on a user-by-user basis as well — so if you have several people with different accounts using the same device, they can each turn location tracking on or off. To turn location tracking on or off for any single account, sign into the account, head back to this same screen and, instead of clicking Change, go to the slider beneath the word “Location” and move it to On or Off.
Finally, this doesn’t have to be an all-or-nothing affair — you can turn off location tracking on an app-by-app basis. If you want your location to be used only for some apps and not others, make sure location tracking is turned on, then scroll down to the “Choose apps that can use your location” section. You’ll see a list of every app that can use your location. Move the slider to On for the apps you want to allow to use your location — for example, Weather or News — and to Off for the apps you don’t.
When you turn off location tracking, Windows 10 will still keep a record of your past location history. To clear your location history, scroll to “Location History” and click Clear. Even if you use location tracking, you might want to clear your history regularly; there’s no automated way to have it cleared.
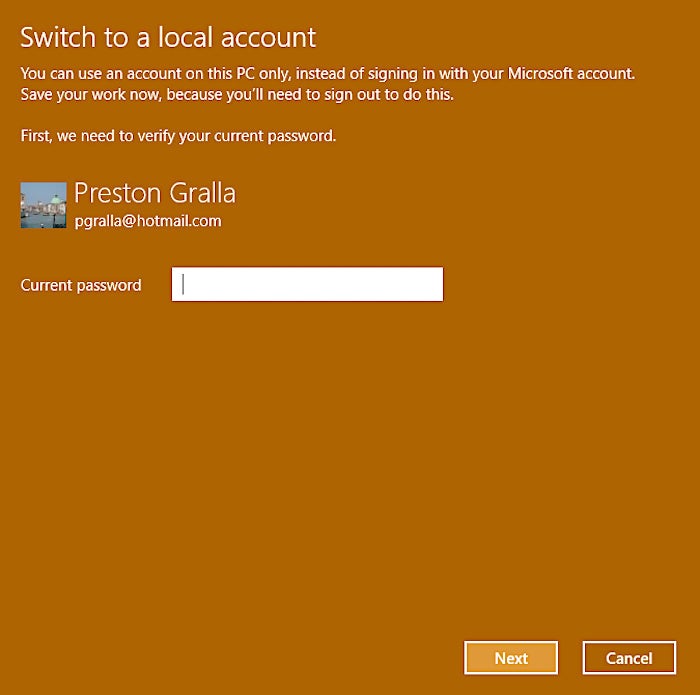
Ditch a Microsoft account for a local account
When you use your Microsoft account to log into Windows 10, you’re able to sync your settings with all Windows devices. So, for example, when you make changes to your settings on a desktop PC, those changes will also be made on your laptop the next time you log in.
But maybe you don’t want Microsoft to store that information about you. And maybe you want to cut your ties as much as possible to anything Microsoft stores about you. If that’s the case, your best bet is to stop using your Microsoft account and instead use a local account.
It’s simple to do. Go to Settings > Accounts > Your info and select “Sign in with a local account instead.” A wizard launches. Follow its instructions to create and use a local account. Keep in mind that when you do this, you won’t be able to use Microsoft’s OneDrive storage or download and install for-pay apps from the Windows Store. You can, however, download and install free apps from the Windows Store.
 Preston Gralla/IDG
Start here to set up a local account.
Get the most out of Cortana
Microsoft’s digital assistant, Cortana, is one of the major additions to Windows 10 — and it’s a winner. Turn it on and Cortana alerts you to upcoming meetings; searches your PC and the Web; tells you about the weather, news and sports; and a lot more.
To help you get the most out of Cortana, I’ve put together a few of my favorite tips for using it — including using Cortana to answer questions directly without sending you to the web, using it to manage your Google Calendar, and using Cortana on the lock screen so you won’t even have to log into Windows to use it.
Note: These tips assume you’re already familiar with the basics of Cortana. If you want help getting started, see the “Say ‘Hey Cortana’” section of Computerworld’s Windows 10 Cheat Sheet.
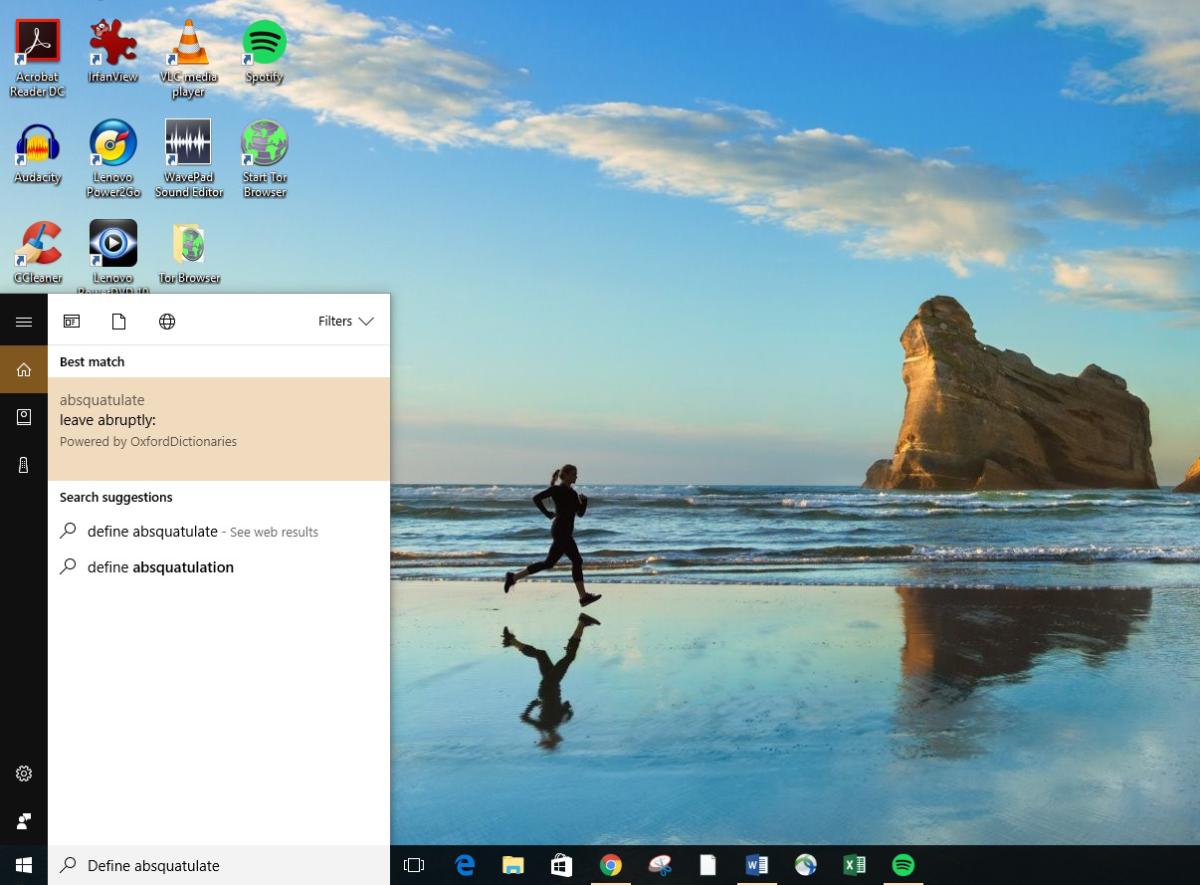
Get a direct answer to your question
When you ask Cortana a question, it will typically show you the answer via a listing of web links; you then open the search results in your browser. That’s what happened, for example, when I asked, “What was the coldest day of the year in 2016 in Boston?”
That’s a useful but time-consuming process, because you have to browse through the search results, click one and then look for information from the web page that appears.
But there are plenty of questions that Cortana can answer directly without first sending you out to the web. Instead, you get your answers right in Cortana’s pane. Following is just a partial list — try experimenting on your own to see what else it knows.
Define [word] Want a definition for “absquatulate”? Just ask Cortana.
 Preston Gralla/IDG
Cortana can offer you answers directly without sending you out to the web.
When is [name of holiday]? Cortana knows when holidays fall on the calendar.
Who is [title of person]? Cortana can tell you the names of the CEOs of Microsoft, Google and Apple, as well the president of the United States. Try other titles and names as well.
What time is it in [place]? Confused about what time it is right now somewhere in the world? Cortana knows.
Convert [currency] to [currency] Want to know the current exchange rates between currencies? Just ask.
How tall is [person]? It knows how tall most famous people are. So it knows, for example, that Barack Obama is six feet one inch tall, and that New England Patriots quarterback Tom Brady is six feet four inches tall.
How long is [movie]? How long is The Godfather? Just ask, and Cortana will tell. However, it doesn’t know every movie ever made, so sometimes you’ll be sent out to the web for an answer.
What is the capital of [country or state]? If you need to know the capital of a country or state, Cortana knows.
Manage your Google Calendar with Cortana
Windows 10 includes a built-in calendar app that works with Cortana. However, if you’re a Google Calendar user, you can get Cortana to integrate with that as well, so you can use Cortana to create and edit appointments and show you your schedule with Google Calendar using the built-in Windows 10 Calendar app.
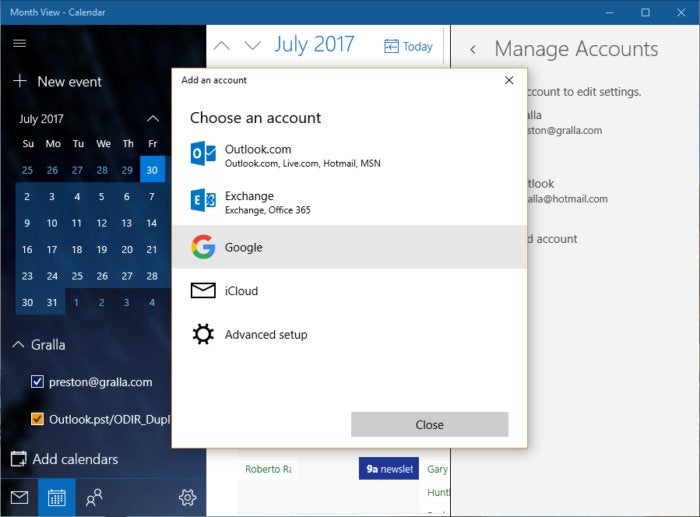
To do it, you need to integrate your Google Calendar with the Windows 10 Calendar. First, launch the Calendar app. (It’s typically found on the upper-left corner of the Start menu. You can also launch it by typing “Calendar” into Cortana, then clicking the Calendar app icon that appears at the top of search results.)
Next, click the Settings icon on the lower left of the Calendar screen — the icon is in the shape of a gear. When the Settings menu appears, select Manage Accounts > Add account. From the “Choose an account” screen, select Google. You’ll be asked to sign in with your Google account information. Follow the prompts to create the account.
 Preston Gralla/IDG
You can create an appointment in your Google Calendar using Cortana.
That’s all it takes. From now on, your Google calendar will sync with the Windows 10’s Calendar app. So, for example, if you ask Cortana to “Create appointment,” you’ll be able to fill in the details using Cortana, including the date, time and purpose. Cortana will add the event to the Windows 10 Calendar. To save it to your Google calendar directly, choose the calendar from the dropdown list just above the Add button. Regardless of which calendar you add an event to, both Google and Windows 10 Calendar will remain in sync.
Also, when you ask to see your schedule — such as by asking, “What’s my schedule today?” — Cortana will show you the events from all of your calendars, including Google.
One downside is that you can’t add events to sub-calendars on Google Calendar (such as “home” or “work”) with any regular success. Sometimes it works, and sometimes it doesn’t.
Use Cortana on the lock screen
If you’ve got the Windows 10 Anniversary Update or the Windows 10 Creators Update, you can work with the digital assistant on the lock screen, which means you won’t even have to log into Windows to use it.
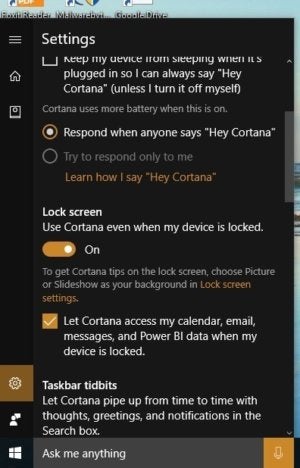
To get started: Click in the Cortana search bar and click the gear icon that appears on the left side of the pop-up menu. This brings up Cortana’s settings.
Scroll down to the lock screen section and move the slider to On. Look just below that for the setting, “Let Cortana access my calendar, email, messages, and Power BI data when my device is locked.” Switch that on as well. If you don’t, Cortana will be limited in what it can do for you from the lock screen — you’ll be able to listen to music and find out the weather from the lock screen, but you won’t be able to set reminders, send emails or add events to your calendar.
 Preston Gralla/IDG
This setting lets you use Cortana on the lock screen in the Windows 10 Anniversary Update.
Once you’ve done that, to use Cortana from the lock screen, you can just say, “Hey Cortana,” and use it from the lock screen as you normally would, to set reminders, play music, check your calendar and more, without logging into Windows.
Miscellaneous tips
Finally, I’ve two more tips for you — one for tweaking the Start menu, and another to control how Windows updates itself.
Tweak the Start Menu
Don’t like the way the Start Menu looks? No problem — you can tweak it. To resize it, hover your cursor over any of its edges until a double-headed arrow appears, and then drag until it’s the size you want. You can also resize the live tiles on the Start menu. Right-click any of them and select Small, Medium, Wide or Large.
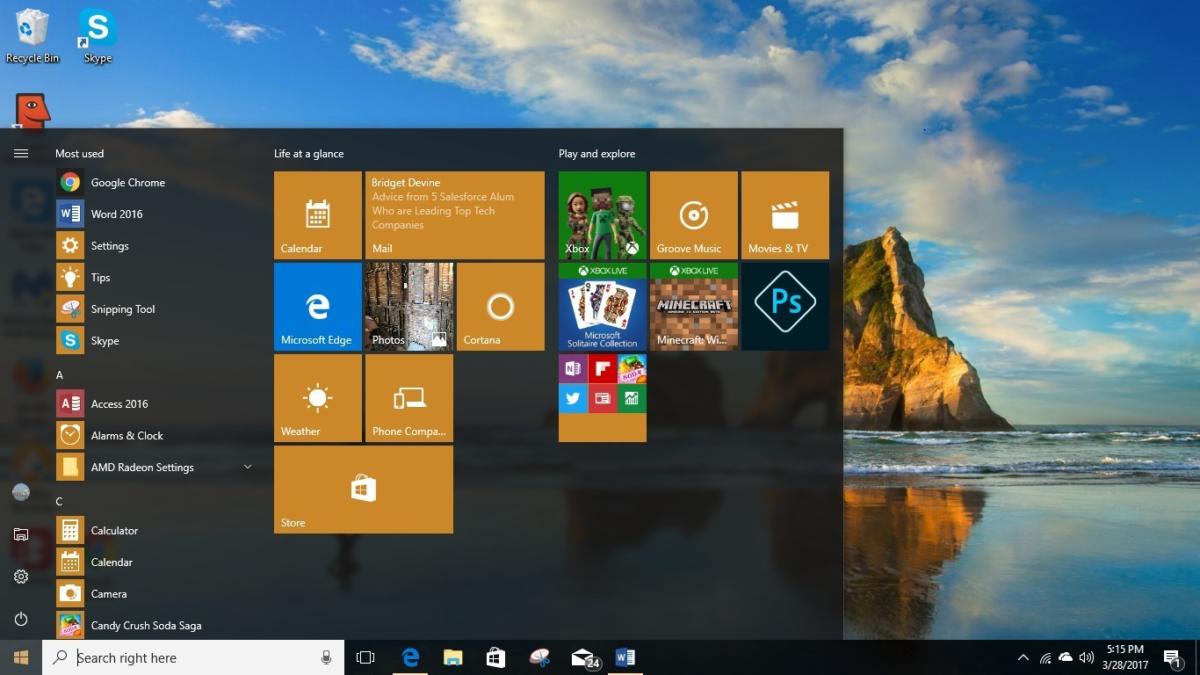
The Windows 10 Creators Update gives you an even more powerful way to tweak the Start menu: Place multiple tiles into a folder on the Start menu. It’s simple: You just drag one tile onto another. This automatically creates a folder with both tiles inside it. You can then drag any other tiles you want into the folder.
Folders look like tiles and display small thumbnail icons of all the apps they contain. Click a folder and it opens, with each app appearing as an individual tile. You can then click any tile to run the app. Click the folder again and all the tiles slide back inside.
 Preston Gralla/IDG
Creating folders in the Start menu, each of which can contain tiles for multiple apps (see the third tile down in the “Play and explore” section).
Control Windows Updates
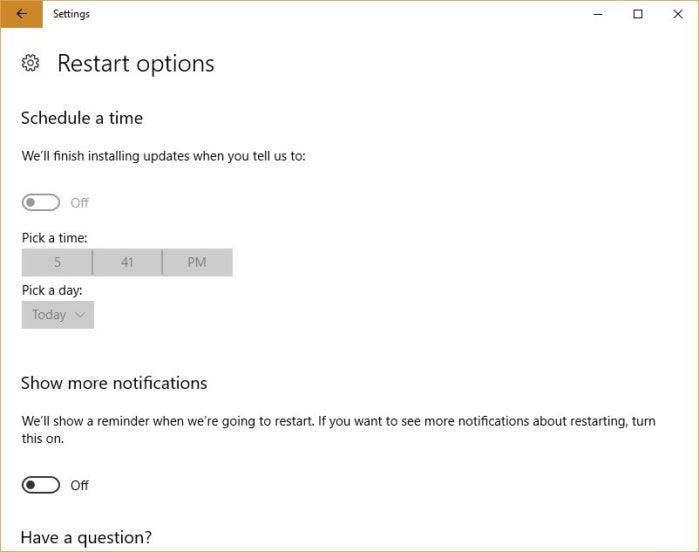
Many people have often complained about the unyielding way that Windows 10 updates itself — you can’t bypass an update, and you have to do it on a schedule set by Microsoft. However, if you have the Creators Updat,e you get some control over the process. In Creators Update, you’re no longer blindsided when Windows interrupts your work to do an update. You’ll be notified when an update is available and given the option of either installing it immediately, scheduling it for a specific time or putting it off by clicking “Snooze.”
Clicking “Pick a time” brings up a dialog box that lets you schedule the precise day and time the update runs. Clicking “Snooze” puts off the update for three days. Three days later another notification appears with the same three options. If you want, you can click “Snooze” again. You can keep doing this to indefinitely put off the update.
 Preston Gralla/IDG
This dialog box lets you schedule a time to update Windows 10.
Source Computerworld